
Dice
Delver’s Deep is played with six sided dice (d6’s). When rolling a d6 to determine the result of an attack or action, a 1 is always a failure and a 6 is always a success.
Stat Checks
Some events require a character to make a stat check using a d6 against a set value called a difficulty class (DC) to determine success or failure. An average stat check will require a four or greater (4+) to succeed.
As above, a 1 on a d6 is always a failure and a 6 is always a success, so the easiest stat check is a 2+ and the hardest is a 6+.
Manipulating Dice Rolls
There are three basic ways to manipulate dice rolls: passive rerolls, active rerolls, and stacking.
Passive rerolls
Passive rerolls allow you to reroll results above or below a certain value without a cost. Beneficial rerolls will generally allow you to reroll bad results below the stated value, while detrimental rerolls will force you to reroll good results above the stated value. For example, a beneficial effect that grants reroll 2’s will allow you to reroll a die that shows a 1 or a 2. Meanwhile a detrimental effect that imposes reroll 5+ will force you to reroll a result of a 5 or 6. Beneficial rerolls will always be written as “#’s”, where the rerolls occurs for each value equal to or less than the stated number, while detrimental rerolls will be written as “#+’s”, where rerolls occur above the stated value.
All passive rerolls can only occur once for each check, and you must keep the new result.
Active rerolls
Some checks allow active rerolls, which requires that you spend points to reroll the result. With an active reroll you can reroll the attempt by spending points regardless of the outcome. You can active reroll once, however this can stack with passive rerolls for a total of two rerolls.
Example of passive and active rerolls on the same check
Bramli the Bulwark takes two points of damage and makes a health check for each one. She has a 3+ health check and she rolls 2d6, getting a 1 and 4 – one failure, one success. A Bulwark class trait gives her passive reroll 1’s on health checks, which she does and gets a 2. She spends a point of Fortitude for an active reroll and turns the 2 into a 5, passing the remaining health check.
Stacked rolls
Some checks will allow you spend points to add additional dice to the same roll. When making a stacked roll, only one success is required for the check to succeed. Rolling 1’s does not cause the check to fail.
Example of a stacked roll
Daerion the Duelist is attempting to dodge an incoming attack. Dodging allows stacked rolls, and Daerion spends 3 points of reflex to roll 3d6 on his dodge check. He has a 4+ dodge check, and he gets a two 1’s and a 5 on the roll, successfully dodging.
Reroll Limit
Regardless of the source, you may only combine two methods of changing the outcome of a single roll. For example, you can combine a stacked roll with a trait that grants passive rerolls, but you cannot also use active rerolls on that attempt.
For a stacked roll, all dice added to the roll count as the same attempt. You cannot choose to use passive rerolls on some dice, and active rerolls on others.
Example of limited rerolls
Daerion the Duelist is attempting a dodge roll with a 4+ dodge check DC. He can make a stacked roll, he has access to a trait that grants passive rerolls on dodge checks, and an ally is casting a spell that will allow him to apply active rerolls. He chooses to make a stacked roll with active rerolls from the spell, forfeiting the ability to apply passive rerolls
Competing Rerolls
When one effect applies a beneficial reroll (e.g. reroll 1’s) and another effect applies a detrimental reroll (e.g. reroll 5+’s) the effects cancel out and the target makes a straight roll without rerolls. This occurs even when the magnitude of these effects are mismatched.
Design Note
We will look at dice statistics later, but in general passive rerolls will only be available as a class trait or a very significant reward because they convey a benefit without a cost. Both active rerolls and stacked rolls can be used more liberally.
3.2 Character Stats
Characters in Delver’s Deep have three primary stats, Fortitude, Reflex, and Will, and three secondary stats, Health, Sanity, and Recovery. All stats have a base value, a max value, and a current value. None of these stats can ever be reduced below zero. Some effects can grant temporary bonuses or penalties to your stats, but temporary effects do not change your base values.
Primary Stats
Primary stats are a combination of your ancestry, background, traits, and point allocation. Characters start with 1 point in each primary stat, plus modifiers from ancestry and background, and gain two points at level one to allocate to any of their primary stats. Characters will gain additional points to increase their primary stats when they gain a level.
Fortitude (FORT) represents physical strength and endurance.
Reflex (REF) represents manual dexterity and agility.
Will (WILL) represents mental acuity and force of will. It is also crucial for casting magic.
Secondary Stats

Secondary stats depend on your base primary stats. You cannot directly allocate points to your secondary stats, but some classes, ancestries, and backgrounds affect them. This table demonstrates how base secondary stats increase as your base primary stats increase.
Health (HLT) represents the amount of damage a character can take before dying. Every two points in base Fortitude increases base Health by one point. When a character reaches zero Health, the next time they take damage could kill them.
Sanity (SAN) represents your mental stability. Every two points in base Will increases base Sanity by one point. When a character reaches zero Sanity, they on the edge of a mental break.
Determining Maximum Health and Sanity
Temporary changes in your max primary stats do not affect your base health or sanity. Base health and maximum sanity are only affected by permanent changes in your base primary stats.
Example of base, temporary, and current fortitude
Bramli the Bulwark has a base fortitude of 7 points and a base health of 4 points. Before battle she puts on heavy armor, applying a -2 reduction to her total fortitude and reducing the maximum fortitude she can have in combat to 5 points. She still has base health of 4 points.
On her turn she spends 3 points of fortitude to make attacks, bringing her current fortitude to 2 points. She still has a base health of 4 points. The next turn she recovers 3 points of fortitude, bringing her back to her max of 5 points. Ani the Archmage casts a spell giving her +3 points to her maximum fortitude. Bramli’s maximum fortitude is now up to 8 points, but she still has a base health of 4 points.
Things that can affect your base secondary stats are:
- Allocating new primary stat points on leveling up
- Character ancestry, background, or traits
Things that cannot affect your base secondary stats are:
- Equipment
- Spells
- Status effects from environmental conditions
- Madness
In practice, determine your base secondary stats without considering the effects of equipment, spells, etc. and then do not change them unless your character levels up or suffers a permanent wound.
Recovery and Stat Pools
Your primary stats (FORT, REF, and WILL) represent pools of points you can draw from to take actions or make checks during combat.
At the beginning of each turn, your character regains points in the recovery phase. Each character has physical recovery and mental recovery. Each point of current health represents one point of physical recovery, while each point of current sanity represents one point of mental recovery. Physical recovery may be allocated to either FORT or REF, while mental recovery can only be used to increase WILL. Characters may also gain bonus recovery based on class, background, and traits. Additional recovery from these features is not reduced by taking physical or mental damage.
Taking physical or mental damage reduces your physical and mental recovery respectively, but does not reduce your base Health or Sanity or your base Fortitude, Reflex, or Will.
Example of taking damage and losing recovery
Weylan the Weapon Master has a base fortitude of 7 points and a base health of 4 points with 5 points of physical recovery (+1 from a trait). Weylan spends 4 points of fortitude to make four attacks, so his current fortitude is 3 points. At the start of his next turn, he has 5 points physical recovery and allots 4 of his recovery points to raise his fortitude back to his max of 7 points. He discards the extra point since his fortitude is at its max value.
Later Weylan takes 3 damage, reducing his health to 1 point, and his physical recovery to 2 points. He again spends 4 points of fortitude to make four attacks reducing his current fortitude to 3 points. However, at the beginning of his next turn he only has 2 points to allocate to fortitude, bringing his current fortitude up to 5 points.
Taking Health Damage
When an attack or effect deals health damage, make one 6+ health check for each point of damage. On a success, that point of damage is mitigated and it does not reduce your current health. For each failure, reduce your current health by one point. Effects and equipment, such as spells or armor can reduce your health check DC. You can spend points of fortitude to use an active reroll on a failed health checks. Each point of fortitude spent allows you to reroll one failed check.
Example of active rerolls on health checks
Weylan the Weapon Master is hit by a melee weapon attack that deals 3 points of health damage. He has an armor class (AC) of 2 so he makes 4+ health checks. Weylan rolls 3d6 and gets a 1, a 2, and a 5 – two failures and one success. He spends two points of Fortitude to reroll the two failed health checks. He rerolls 2d6 and gets another 1, and a 4. In total Weylan takes one point of damage.
When a character reaches zero health the next time they take damage could kill them. When a character takes damage at zero health, make a death check to determine if they die. On a 4+ they survive and on a 3 or below they die. On a 6 the character rallies and regains 1 point of health. Each attack or effect at zero health only triggers one death check, regardless of how much damage the attack deals. A character’s death check DC is 4+ by default and is not the same as their health check DC.
Taking Sanity Damage
When an attack, spell, or effect deals sanity damage, make one 6+ sanity check for each point of sanity damage. On a success, that point of damage is mitigated and it does not reduce your current sanity. For each failure reduce your current sanity by one point. You can spend points of Will to gain an active reroll on a failed sanity checks. Each point of Will spent allows you to reroll one failed check. Various effects and traits will reduce your sanity check DC.
When a character reaches zero Sanity they are on the edge and the next time they take sanity damage they could suffer a mental break. When a character at zero Sanity takes sanity damage, make a mental break check with a d6 to determine the outcome. On a 4+ they maintain their sanity and suffer no ill effect. On a failed check, they suffer a mental break and must roll on the mental break table to determine the outcome.
While under the effects of a mental break, a character may take an action to make a 6+ Sanity check in order to end the effect. If the character suffers another mental break, the duration of this effect is extended until their next rest when they can attempt a 6+ Will check to end the effect. If they suffer a third mental break the effect becomes permanent madness and remains active until cured.
A fourth mental break causes an additional effect rolled on the mental break table, with the cycle repeating with each additional mental break.

3.3 Math – Basic Rules
Let’s take a look back at the rules we have introduced here.
Statistics of Basic Dice Rolls
I like the simplicity of “always succeed on a 6, always fail on a 1” but that means that the chance of success and chance of failure will always be at least 1/6 (0.1667…). Figure 1 demonstrates the probability of rolling a success on a single d6 where the x-axis is check difficulty. Pretty simple – as your check DC goes down, the probability of a success goes up. Note that for a single d6 roll, a 6+ check is pretty hard and a 2+ is almost guaranteed. In my opinion the probability of an unmodified d6 roll can be a little immersion breaking. When your highly skilled assassin character whiffs four attacks in a row it feels very disappointing. Not every attack should hit, but in order to provide a sense of character skill and a wider array of probability, characters should be able to shift the odds in their favor by investing resources. Additionally, every roll that imposes a detrimental effect (e.g. an attack) or a significant benefit should involve at least two, dependent d6 rolls.

Dice Shenanigans
First let’s look at beneficial passive rerolls. If the first attempt at a roll is equal to or lower than your reroll threshold, you reroll the die keeping the new results. The probability of a success on a check with a passive reroll is

where the additional chance of success depends on how high your reroll threshold is. Figure 2 demonstrates the probability of success for a check with a given DC (2+, 3+, etc.) with passive rerolls ranging from reroll 1’s at the low end to reroll 5’s at the high end. The probability of success is in the center of each cell which are color coded by value. Red is the greatest probability of success, blue the lowest.
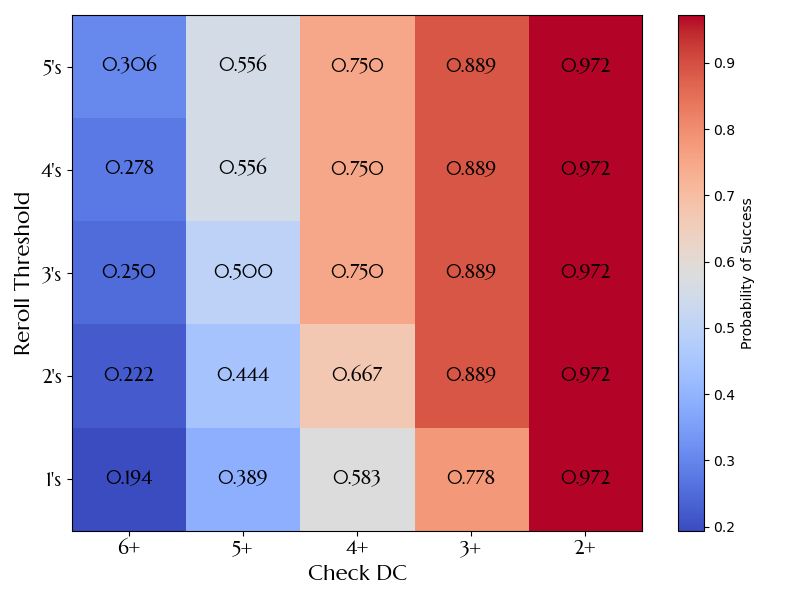
Ok, it is clear that passive rerolls are very strong as they allow you to shift the odds in your favor without spending a resources. Also note that they are weakest when your chance of hitting is lowest (5+, 6+), get stronger as your chance of hitting goes up (3+, 2+). At the lowest reroll threshold (reroll 1’s) the additional probability of success for a 6+ check is only 2.7% but for a 2+ check that becomes 13.9%, almost as good as reducing your DC by one on a single d6 roll. Also passive rerolls stop adding value when the reroll threshold is equal to your Check DC. That is to say that reroll 3’s (i.e. reroll a 1, 2, or 3) is not more valuable than reroll 1’s if your check DC is a 2+
I think it is a reasonable conclusion that most (~90%) of passive rerolls available should be reroll 1’s, with very rare reroll 2’s. Inversely, detrimental effects that impose rerolls on good results (i.e. reroll 6+’s or reroll 5+’s) should be mostly reroll 6+’s, with very occasional reroll 5’s.
Active rerolls allow you to reroll any result (presumably any failed result) by spending resources. Where the probability of success on a d6 roll including an active reroll is

Figure 3 presents the probability of success for a roll with a single active reroll.

Active rerolls are generally stronger than passive rerolls (assuming only reroll 1’s and reroll 2’s) but they can be balanced by resource expenditure. Having a very high chance of success on a given roll is fine, so long as the chance of success is never 100% and the player needs to make the choice to spend points to make it happen. Note that when your chance of success is high (2+, 3+), active rerolls are less beneficial than they are for a roll with a low chance of success.
The best case scenario for success is combining active and passive rerolls. Figure 4 compares the probability of success for a direct d6 roll, passive rerolls (1’s & 2’s), active rerolls, and both active and passive rerolls.

I calculate the probability of success combining both active and passive rerolls assuming that an active reroll will take place first, than a passive reroll since active rerolls are generally more likely and that maximizes the probability of getting a passive reroll. Using both an active and passive reroll will shift the odds even more in your favor. However, the effect of combining passive and active rerolls is minimized when you already have a high chance of success.
Let’s look at stacked rolls. The probability of success for a stacked roll is

Figure 5 compares the probability of success for stacked rolls with different DC’s depending on how many dice you roll.

At any level spending points to add dice to your roll is a great way to shift the odds in your favor, but again it’s most effective at the intermediate check DCs. Spending just one point on a 4+ check to roll 2d6 gives you a better chance of success than a 3+ check.With enough points spent you can approach 100% chance of success for any roll, with diminishing returns. You would have to spend near 30 points to approach a 100% probability of success on a 6+ check. Because stacked rolls have a cost I think it is reasonable to assume that the average stacked roll will be 2d6 or 3d6.
Adding the possibility of rerolls shifts the odds even more in your favor. Figure 6 presents the probability of success of a stacked roll with the addition of passively rerolling 1’s. For brevity Figure 7 presents the possibility of success of a stacked roll plus reroll 1’s, reroll 2’s, and active rerolls but only for a 6+ check. We can assume that all other DCs converge to one faster.


3.4 Summary
Dice and Stat checks
- Stat checks in Delver’s Deep are made with d6 dice
- A success on a stat check must be greater than or equal to the difficulty class (DC). A typical DC is 4+ (50% chance of success), requiring a 4 or greater to succeed. 6 is always a success and a 1 is always a failure
- You can use passive rerolls, active rerolls, and stacked rolls to modify the difficulty of a given roll.
- You can only combine two of these methods on a given roll
- A beneficial reroll and a detrimental reroll cancel each other out
- Passive Rerolls
- Allow a player to recoll a result that is equal to or less than the reroll threshold
- Typically reroll 1’s, and should never be greater than reroll 2’s
- Active Rerolls
- Allow a player to reroll any result by spending stat points
- Can only be used once for a single die
- Stacked Rolls
- Allow a player to add dice to a stat check to increase the chance of success
- A single success on any die rolled during a stacked rolls is a success on the check
Primary and Secondary Stats
- Characters in Delver’s Deep have three primary stats, Fortitude (FORT), Reflex (REF), and Will (WILL), two secondary stats, Health (HLT) and Sanity (SAN), and recovery
- Primary stats represent pools of points that are used to take actions and make checks. These point pools are replenished at the start of each turn using recovery
- Secondary stats cannot be directly increased, but are increased when you allocate permanent points to your primary stats
- Physical recovery is equal to current health plus any bonuses, while mental recovery is equal to current sanity plus any bonuses Physical recovery can be used to increase FORT or REF, but mental recovery can only be used to increase WILL
- A character at zero health might die the next time they take health damage. Likewise, a character at zero sanity might have a mental break next time they take sanity damage.